Two Old Wagons
by Erik Olsen
The Background
I was born in 1954 at Vesterbro in Copenhagen. We lived in Halmtorvet not far from the Central station and the goods yard. When I was 4-5 years old, my father for a period worked in shifts. When he was working the evening shift, he sometimes during the day hours took my younger brother and me out for a walk. We often went to Dybbølsbroen (a road bridge crossing the station and goods yards) and the sheds at Otto Bussesvej. There were still running a lot of steam, and many of the coaches were older rebuild ones. There were still many of the older type QG, QH and QR vans and PF and PJ wagons among the goods stock and a lot of white (meat) vans to and from Kødbyen. This traffic was since completely taken over by lorries. My interest in railways was no doubt founded at this time in the last years of the fifties.
When I was a small boy my father built a model railway in H0 scale. When I became 13 I started building one in N scale. Later on I switched from N to 0 scale. After a time as an active member of Dansk Model-Jernbane Klub I decided to start on my own; now I could build models of older locomotives and rolling stock as I liked.
I chose the time around the century when there was an immense technological development going on, but the locomotives and rolling stock were still rather lightly built. Exactly this lightness I wanted to recreate in model form. The continental NEM standards, however, prescribe a 4.7mm minimum wheel width, a 1.2mm flange thickness and a 1mm minimum flange hight for 0 (32mm gauge, 1/45 scale) which are roughly 60 percent overscale. It didn't give the right impression. I also did not like the outside third rail for current collection and the automatic couplings used in Dansk Model-Jernbane Klub. So I decided to make my wheels in exactly 1/45 scale, to spring all wheelsets, to use screw-link-and-hook couplings instead of automatic ones and to collect current through the running rails alone (that ment two-rail system and hence insulated wheelsets). I also decided to model all visible details, if necessary in simplified form.
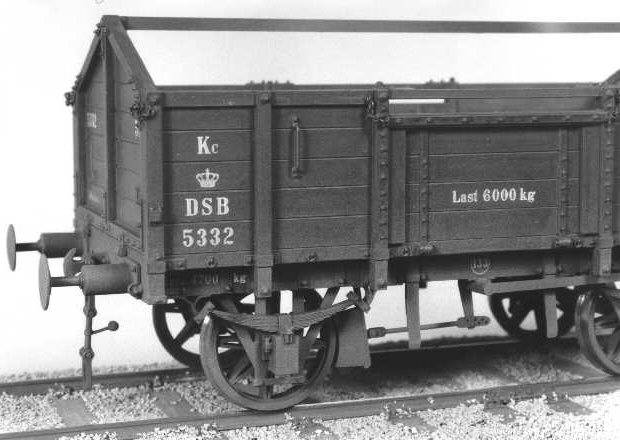
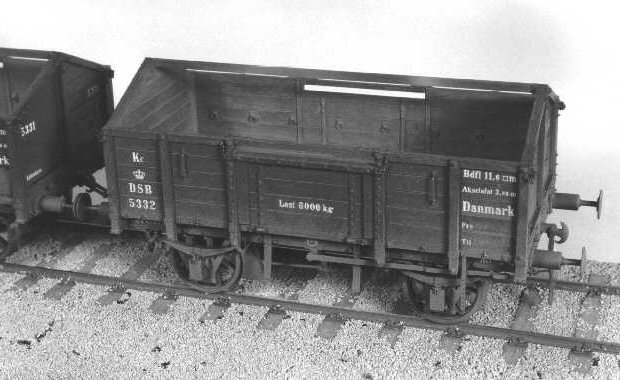
The models of the old Zealand type KC open wagons are a result of my nostalgic interest in railways. Even though the technical development had produced bigger and heavier stock, there were still running quite a lot of these small wagons around the century. They are quite droll with their small size, timber underframes, drop doors and pointed drop ends with tarpaulin beam.
Click here to see the whole drawing.
How the models are built
The drawings show the KC-models as I have built them. I did not have a prototype drawing of the hand-braked type which I chose. As a basis I used a photographically reduced drawing of a similar type with screw brake which I had bought from the drawing archives in Jysk Model-Jernbane Klub. In books I found pictures of similar wagons, in a copy of the 1890 equipment register for the Danish State Railways on Zealand I found a simplified dimensioned drawing, and in "Driftsmateriellet" from Dansk Jernbanearkiv I found further information.
The underframes are built from brass. The solebars are from 5x2mm and the buffer planks from 7x2 mm bar. The w-irons are etched from 0.5mm sheet, cleaned up and soldered to the solebars with a piece of 0.2mm shimstock in between so as to keep a small distance from the w-iron to the spring. The buffer planks are drilled 3mm for the buffers and 1.5mm for the coupling hooks, the latter hole filed to a square cross section. The solebars and buffer planks are soldered to a piece of 1.5mm sheet which has cut-outs behind each buffer plank for the buffer shafts and coupling hook and two 1.5mm holes for the fastening of the body. The inside longitudinal and crosswise members are not modelled.
The spring brackets are made from 2x0.3mm strip and soldered to the solebars. The plates for the coupling hooks are cut and filed from 0.5mm sheet and soldered to the buffer planks. Nut-bolt brass castings are inserted into holes drilled through plate and buffer beam and soldered. Crown plates and brackets are made from 0.2mm shimstock with pre-drilled holes for bolts and stuck onto the solebars with cyanoacrilate adhesive. The holes are then drilled through the solebar and nut-bolt plastic castings inserted and stuck with cyanoacrilate adhesive.
The buffers are self-contained and sprung. The buffer housings are turned from brass bar, the flanges are milled and bolt holes drilled in a jig. They are stuck onto the buffer planks with cyanoacrilate adhesive, the bolt holes are drilled through the buffer planks and nut-bolt plastic castings inserted and stuck with cyanoacrilate adhesive. The buffer rams are turned from brass bar with a M1.0 thread at the inner end. The buffer plates are cut from 0.3mm brass sheet, drilled centrally and turned on the outside diameter 8 or 12 at a time on a mandrel. Half of the plates are rounded in a simple pressing tool. The plates are soldered to the rams, excess solder is cleaned off and the edges of the plates are rounded. The springs are wound from 0.2mm piano wire, drawn out to the right pitch and cut off a little too long. The ends are then ground flat with a fine cutting disc in a motor tool. The springs are put onto the rams which are inserted into the buffer housings an secured with M1.0 nuts.
The coupling hooks are my own white metal castings and the coupling springs are wound from 0.3mm piano wire. The coupling shackles are etched from 0.5mm brass sheet, the two upper shackles on each coupling are soldered to a turned brass bolt. The coupling screws and trunnions are one-piece white metal castings. They seem to be strong enough for normal operation, but they'll break if a train is handled too roughly just as the prototype.
The parts for the working leaf springs are etched from 0.2mm tin-bronce sheet, the spring bands are assembled first and the leaves fit into it in the right order. Pieces of 0.5mm brass wire are inserted through holes etched in spring bands and leaves and soldered wery carefully at the top. The upper ends of the wire are cut off flush, the lower ends 1mm long so as to fit into 0.6mm holes drilled into the top of the axle boxes. The spring shackles are made from 1x0.2mm brass strip and the spring bolts are 0.5mm brass wire inserted into drilled holes. They are soldered with a small bit and a very small amount of solder which requires a steady hand. The axle boxes are white metal castings which slide in the w-irons with around 0.1mm slop, bearing holes are drilled centrally into the boxes and PTFE bushes inserted. The wheels are made from turned and milled brass centres soldered into turned steel rims, turned polyacetal plastic insulation bushes are pressed into the centre holes and the wheels are pressed onto turned steel axles. The brake blocks are made from 1.5mm polystyrene plastic sheet. The other parts of the hand brakes are made from brass and soldered or glued as appropriate.
The bodies are made with floors from pieces of brass and polystyrene plastic sheet glued together with fast-setting epoxy adhesive, brass face down. The other parts of the bodies including the strapping are made from polystyrene plastic sheet and strips from Evergreen and welded together with solvent. Nut-bolt plastic castings are from Grandt Line. Certain small parts of the fittings for securing the drop doors and ends are made from brass and stuck into drilled holes with cyanoacrilate adhesive. The chains are Grandt Line's finest (0.8mm pitch) and the rings and staples securing the chains are made from 0.25mm wire. Grab irons and tail-end lamp holders are made from brass and stuck with cyanoacrilate adhesive. The bodies are fastened to the underframes with two M1.4 screws on each wagon run into threaded holes in the brass floor part.
I chose this design with brass sheets in the underframes as well as in the floors in order to raise the weight of the wagons to 250g each. This is necessary to make the leaf springs work properly. I prefer to integrate the weight in the underframes and bodies rather than fitting weight plates as an afterthought. I find that with such short open wagons a weight of 125g per axle can only be achieved by the method described unless, of course, the models are made exclusively from metal.
Painting, lettering and weathering
The underframes are airbrushed with Floquil "Weathered Black" (mix: 75 percent paint and 25 percent Dio-Sol). The outside of the bodies are airbrushed with Floquil "Boxcar Red" (mix: 70 percent paint, 20 percent Dio-Sol, 8 percent Glaze and 2 percent Retarder). The addition of Glaze makes the paint layer smoother and less matt. The addition of Retarder prolongs the drying time and makes the paint layer smoother. Floquil paint dries dead-matt when airbrushed without addition of Glaze. For painting of rolling stock I now allways add both Glaze and Retarder to get the smoothest possible painted surface. The painted parts should dry at least a week before any further handling takes place. Inside, the bodies are brush-painted with Humbrol no. 64 "Grey", no. 110 "Natural Wood" and a little no. 33 "Matt Black". The colours are blended wet while painting. A little talc is mixed with the wet paint in the floor corners to represent dirt or gravel. The black felds for chalk markings are painted with a fine brush and Floquil "Engine Black".
The lettering is dry transfers especially made for these wagons by a small artwork company in Copenhagen. I draw the lettering in a computer drawing program and print it in 4 times model size. I then assemble lettering for 10 vans and wagons and have a photografic negative in model size made. The negative is then used for making the A4-size lettering sheet.
The wagons are weathered in the following way. First the hole wagon was washed in a thin solution of Humbrol no. 33 "Matt Black" in Humbrol Thinner with a wide soft brush, this creates the illusion of dirt trapped in corners and grooves. When this was dry, however, it looked a bit patchy and not right at all. I then tried in the same way with a solution of Polly Scale "Grimy Black" in Polly S Airbrush Thinner, it looked much better. On the buffers, springs and axle boxes I drybrushed a little Humbrol no. 53 "Gunmetal" which looks like oily residue. I then airbrushed a very fine layer of Humbrol no. 29 "Dark Earth" and no. 63 "Matt Sand" thinned well with Humbrol Thinner over the whole wagon, most heavily on the underframe and the lower part of sides and ends. When this was dry the thin wash of "Grimy Black" was repeated on the inside surfaces. Chalk markings were made with a white colour pencil on the black fields which was then dusted with talc. One of the wagons was treated with a fine layer of talc inside as well. The two wagons are weathered differently, no. 5331 being cleaner than no. 5332.
I am still experimenting with weathering of rolling stock. I think the most realistic results are achieved by using different methods on the same vehicle. Proper lighting of the work space is very important, it has to be light enough so you can clearly see the effect of each treatment. The weathering shuold be built up using more thin layers, if it gets too filthy it will not look like a railway wagon. I have used many of the ideas in that marvellous book "The Art of Weathering" by Martyn Welch (Wild Swan Publications Ltd., Overseas Department, 9 Hacker Close, Newton Poppleford, Sidmouth, Devon EX10 0HF, England). The book costs GBP 10.95 plus post and packing and is heartily recommended. You can write to Wild Swan to get a catalog and current prices.
Changes:
2008-03-15: Updated to HTML 4.01 Strict.
2009-01-02: Typeface updated.