A Brown IV-type Ventilated Van in 1/45 Scale
by Erik Olsen (first published in "Lokomotivet" no. 50A in december 1997)
The underframe
I originally built this underframe from brass for a QE-type cattle van model. As the model should be from 1900, the QE van had to be from the first series built in 1895-98. After some time I found out that the 1895-98 series had a long brake axle while I had built the model with a short one. The first QE van with short brake axle was not built until 1904. So I had to make a new underframe for the QE van.
I could, however, use the underframe with short brake axle for a DSB (Danish State Railways) type IV van as the underframes were nearly identical.
The IV type van - white or brown?
The first series of IV vans was built in 1900 and the model had to look quite new. I studied Dansk Jernbanearkiv's "Driftsmateriellet" (Equipment Register) and found out that many IV vans were brown at the delivery and were later repainted white. In the ID van section in "Driftsmateriellet" was shown a photograph of an ID van and an IV van, both brown, in the old Fredericia yard during the first years of the century. Later I found the same photograph on page 92 in the book "Da Fredericia var færgernes by". On page 27 in the book "Nordbanen" by John Poulsen is a photograph from Lyngby in 1907 which shows brown IV and IG vans (IG were similar to IV but handbraked). In an article by Jens Bruun-Petersen in "Lokomotivet" no. 46 I found more information and photographs of brown IV vans.
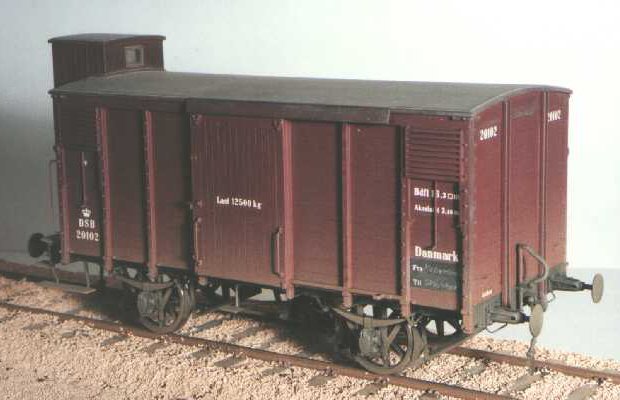
There is some doubt, though, on which vans were delivered painted brown and which were white. The production list from "Scandia", reprinted by Dansk Jernbanearkiv, says that nos. 20001-20100 (order 152) and no. 20101 (order 202) were delivered painted white. Nos. 20102-20120 were built by Kelsterbach. In the addendum dated 1st May, 1902, to the 1898 DSB equipment register nos. 20001-20100, 20107 20133 and 20136 are stated as painted white. It would not have been logical if nos. 20001-20101 had been delivered painted brown only to be repainted white few years later while more brown vans were delivered. Mostly the vans were repainted every 6-8 years. Therefore I have chosen the number 20102 for my model - it is also a nice symmetrical number.
The body
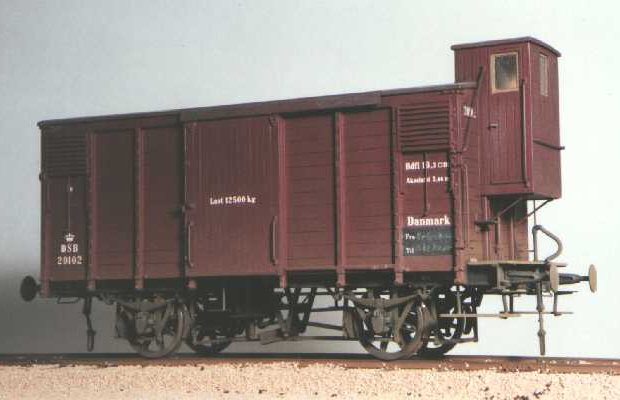
I built the body from wood, the floor from 4mm birch plywood and the sides, ends and doors from 1.5mm birch plywood. The roof was planed from a piece of hardwood (pear I think, from an old drawing board). For the outside framing I used stripwood from the US-company "Northeastern" (basswood). The end stanchions was made from milled brass U-profile. The brake guard house was made from 1.5mm and 1mm birch plywood. When the woodwork was completed and before any other details were added, I applied a layer of shellac and the surfaces were sanded with fine wet-and-dry.
I made the louvres from strips of polystyrene plastic which were welded together while held in a jig. In this way the horizontal strips were tilted the correct angle. When dry the back side which was pointing upwards was sanded flat and a piece of 0.5mm polystyrene sheet welded on. When this was dry I took the louvre out of the jig and sanded the front side. See the drawing as to how the finished louvre look. In fact the finished ones are very nice, the secret is using the jig which I milled from brass. A hand-built jig can of course be used, it is important that it is made from metal so that the polystyrene parts won't adhere.
The louvres were glued on with cyanoacrylate cement, plus the brake screw and handle, strapping, nut-and-bolt mouldings, grab irons, lamp holders and other details. They were made from polystyrene plastic or brass as appropriate. The handles for the hatches which on the real vans can be slid down from behind the louvers, are placed where the lettering has to go so they were not glued on and painted until the body had been painted and lettered.
Some time after having painted the body first time I assembled the van and found out that it was too light. To increase the weight of the van I had to mill out a recess in the body floor and glue a piece of 1.5mm brass sheet into the recess. After this treatment the total weight was 270g which is needed to make the leaf springs work properly.
Painting
The underframe was spray painted with Humbrol Matt Black but it did not stay on so I cleaned it off again. The body was spray painted with a brown Humbrol paint that I mixed myself. It seemed to be too dark, though, so I repainted it with Humbrol bauxite (I read in "Lokomotivet" that this colour was right). It was actually too light. After this the paint dried a couple of years.
Last year I got colour cards and some paint from the US-company "Floquil". I painted 30x50mm pieces of 1.5mm polystyrene sheet with Floquil paint samples mixed from different colours and took the samples to the Danish Railway Museum in Odense. I compared the samples with the colour on the QA 2804 cattle van and F 56 van which I hope was painted correctly. Back home I mixed Floquil paint like this: 50 percent Caboose and 50 percent Tuscan Red, diluted with 25% Dio-Sol as recommended. I sanded the body of the model slightly and painted it with an airbrush. When dry the colour was too matt and had a worn reddish look. I applied a layer of Floquil Matte Finish with 6-7 Glaze added to make it less matt. That did it.
This colour is perhaps a little too red but I won't repaint the model. On real vans there were also slight colour differences. On recent models of goods stock from Danish State Railways I have used Floquil Boxcar Red with 5-8 percent Glaze added, this colour seems just right on the models.
I painted the black patches for chalk markings with Floquil Engine Black and a fine brush. The roof was painted with Floquil Concrete with a little Grimy Black added (14:1), this gives a light brownish grey. I painted it with a brush as I dislike masking which would have been necessary if airbrushed. This grey is very close to the colour that was used on canvas-clad roofs (used on the BK 714 carriage in Danish Technical Museum and on a 1/10 scale model of a type CK carriage in Danish Railway Museum). In operation the roofs became dark brownish-grey and the roof on the model seemed a little too light. On page 47 in the book "Københavns Banegårde" is a photograph from the Copenhagen goods yard circa 1905, showing two brown IV vans with light grey roofs. This photograph I used when weathering the model.
I also airbrushed the underframe with Floquil paint mixed from 50 percent Engine Black and 50 percent Grimy Black with Glaze added and diluted with Dio-Sol. This colour is right for newer underframes. For older underframes I use Grimy Black (a brownish dark grey) or Weathered Black (a neutral dark grey). Floquil paint adheres reasonably well on brass if the surfaces are well cleaned and dried before painting. Matt Floquil paints dry to the touch quite fast and a second layer can be airbrushed shortly after applying the first one. But it needs a week to dry thoroughly before handling or any touch-up is done with a brush.
Lettering
During a couple of years I made ink drawings of prototype lettering in order to use them for my models. The intent was to make the lettering sheets with 3M's INT system (Image And Transfer). Unfortunately, I did not get that far before 3M discontinued the INT system due to the demand decreasing as the graphics trade computerised. When it was known that the development chemical was poisonous many companies discarded their remaining stock of INT.
On the other hand the technical development also helped me. I got a computer myself and with a drawing program I was able to draw and especially to reuse lettering, and it is faster than hand-drawing. I drew the lettering for one van or wagon on a sheet of approximately 50x85mm and print it in 4 times model size. I then assembled lettering for 10 vans and wagons so the resulting sheet size was A0 (1189x841mm) as there has to be an unused border of 20mm all around on the finished A4 sheet. I had a negative film made in ¼ size (by the company Tutein & Koch in Copenhagen, price approximately 250 dkk plus vat).
The negative film I took to a small graphics company Baseline in Nybrogade 10, Copenhagen. They are able to make the most beautiful dry transfer sheets for the price of 350 dkk plus vat for one A4 sheet in one colour. When applying the lettering to the model I cut out the sheet so that the pieces fitted between the outside framing or whatever was most convenient. This way it was easier to control their correct placement. The lettering was applied by rubbing the backing sheet with a smooth rounded object (the end of a knitting needle). The small lettering on the solebars was a little difficult to apply, one of them I did not get quite right, so next time I'll make extras of those.
This way the lettering cost me about 75 dkk for each van or wagon, and the result is perfect so I'm rather satisfied with it. It does, however, require some planning to make lettering for 10 vans and wagons.
Finishing
I painted the window frames in the brake guard house with a small brush, touched up the other paintwork and assembled the van. The body was weathered with a little Polly Scale Grimy Black diluted in Polly S Airbrush Thinner so that a small amount of paint adheres in nooks and crannies. Several layers were applied to the roof so that the light grey colour was toned down. The underframe was dry-brushed around axle boxes, springs and buffers with Humbrol Gunmetal which gives a dirty oily colour. I then airbrushed a thin layer of Humbrol 3 parts Dark Earth and 1 part Matt Sand on the underframe and the lower part of the body (dust from the gravel ballast). The upper part of the body including the roof was airbrushed with a thin layer of Humbrol 2 parts Matt Black and 1 part Dark Earth (soot from the locomotive). Chalk markings was added by means of a white colour pencil and some talc was powdered on.
Conclusion
Naturally, I have learned some from the building of the IV van. Firstly, it is important to plan how the van is to be build. The detailing did not take kindly to milling out the floor for a piece of 1.5mm brass sheet to increase the weight. Secondly, do not use wood for van bodies. Well, perhaps if it is an old van where the paint is peeling off then wood may be used. But the structure of wood is too rough for a new or well maintained van and it is impossible to hide it completely. Furthermore, the grooves between the individual cladding planks don't come out quite so nice on wood. These old vans were built and painted with care. For instance, if the planks were planed by machine they were to be sanded by hand afterwards. I find that polystyrene plastic is a better material for the body on van models.
Post Scriptum:
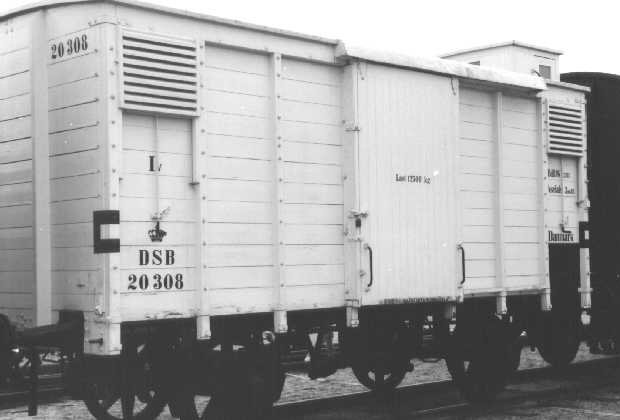
At the Danish railway's 150 year anniversary I watched the cavalcade that was arranged by the DSB. On Lersøen yard I studied IV 20308 closer as it was part of the goods train. I discovered that I had made en error on my model of IV 20102. The stanchion to the right of the side door (which slides to the right) has bolt heads that are countersunk as the door could not open otherwise. On the model I had used normal nut-and-bolt ends. My only excuse is that the door was glued on so I could not test it. The error has since been corrected by means of a scalpel and a little paint ...
Changes:
2008-03-15: Updated to HTML 4.01 Strict.
2009-01-01: Typeface updated.