Working Leaf Springs in 1/45 scale
by Erik Olsen
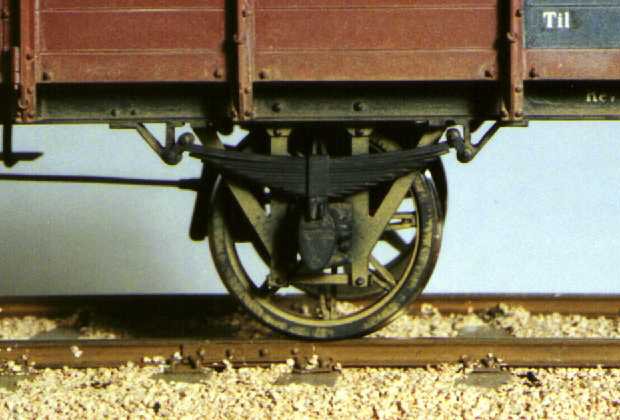
I use working leaf springs on my 1:45 scale models. The first photograph shows my most recent model, of a PF-type open wagon build in 1894 for the Danish State Railways. These wagons were the first four-wheeled goods vehicles in Denmark to have a carrying capacity of 12500kg, and they had rather massive carrying springs. In model form they tend to be a little on the stiff side even though this model weighs 280g. I try to solve this by curving the two uppermost leaves at 50mm radius and the others at 60mm radius, making the spring progressive. This seems to work well.
My general rule on wagon/van/coach weight is: 100g plus 1g per mm length over buffing faces, four- and six-wheeled vehicles at least 125g per axle and eight-wheeled vehicles at least 100g per axle.
Making the components
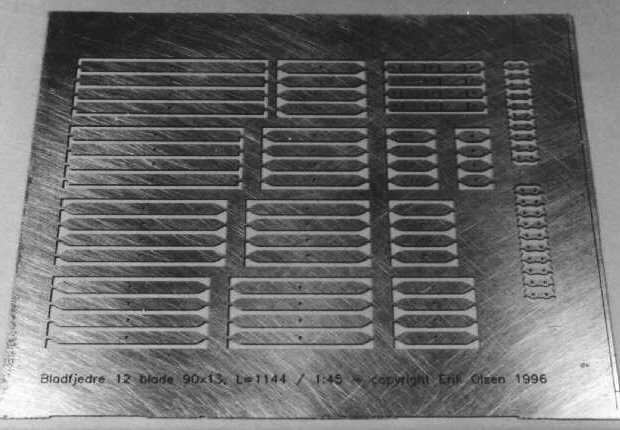
Springs are made from phosphor bronze strip or sheet, mostly 0.3mm thick but I have on occasions used 0.2mm. The second photograph shows an etched fret for one set of springs of the type used on the PF-model, the fret contains spring leaves, spring bands etched half through in the corners, and spring shackles.
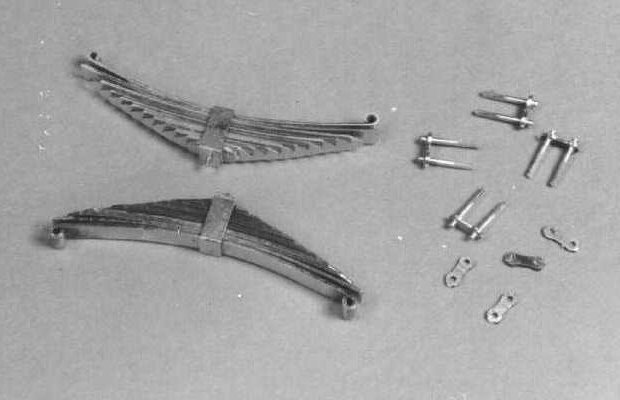
The parts are cut from the fret and filed smooth. The ends of the uppermost leaf are annealed slightly and the loops bent with a pair of flat smooth-faced pliers around a 0.6mm piano wire. The spring leaves are curved with pliers and fingers as appropriate testing against home-made plastikard templates. The spring band is bent and soldered at the top corners and the bottom which is double thickness. Excess solder is cleaned off and a 0.5mm drill run through the holes.
Addendum: I have just made myselv a small sheet roller with two fixed lower rollers and one movable upper roller; the rollers are 5mm diameter and 60mm long. In one end of each of the lower rollers I have turned a rectangular groove of 2.1mm width and 0.3mm depth. In those grooves I can curve 2x0.3mm strip and etched spring leaves so that the curvature is uniform. It works quite well and saves a lot of time and tender fingers! The procedure for the upper spring leave is altered a little; firstly the leaf is curved in the sheet roller, secondly the loops at the ends are formed, og thirdly the curvature of the leaf is checked and corrected if necessary.
The W-irons are made from 0.5mm brass sheet and riveted to the solebars. The axleboxes are white-metal castings and an easy sliding fit in the W-irons (allow for paint thickness). The sliding faces have to be smooth and without burrs. The axleboxes are drilled for PTFE bushes and on the top 0.6mm holes are drilled 1mm deep to guide the springs. The spring brackets are white-metal castings which are drilled 0.6 mm and soldered to the solebars.
Assembling the springs
The spring leaves for one spring are put on a 0.5mm brass wire in the right order, gripped with a pair of flat smooth-faced pliers and inserted in the spring band, it should be a push fit. If too tight a little should be filed off the leaf sides or the inside of the spring band. The wire is withdrawn, the spring band pushed further on until the holes align, and the wire reinserted. The wire is soldered to the spring band at the top, cut off and filed flush. At the bottom the wire is cut off 1mm long and deburred.
Pairs of 0.5mm holes are drilled 4mm deep in a piece of planed hardwood, using the spring shackles as a template before cutting them from the fret. Pieces of 0.5mm brass wire are inserted in the holes, a shackle slipped over and soldered to the wires. The wire ends are cut off, filed smooth and deburred with a steel-wire wheel. The shackle-plus-wires is lifted out of the holes with a scalpel blade and cleaned on the backside.
It is then inserted in the spring and bracket from the front, another spring shackle slipped over the wire ends at the back and soldered while holding together with a pair of tweezers. The wire ends are cut off. After assembly, the springs and shackles are cleaned thoroughly and worked to get any stiffness out.
This calls for some careful soldering as you can imagine, if you linger just a moment too long everything is soldered up solid. I am using a 50W Weller iron with the longest and narrowest tip obtainable and I have only once made a mess of it by touching the white-metal brackets with the hot tip.
Painting and final assembly
The parts are painted with an airbrush before final assembly. It is important not to let paint seep between the spring leaves, the paint should be rather fast-drying and not put on too wet. I use Floquil paints with Glaze added and diluted with Dio-Sol, cellulose paints should also work well.
After drying at least a week the springs and shackles are again worked until satisfactory. The axleboxes are tried in the W-irons and any paint build-ups are carefully removed by sanding with fine wet-and-dry. The wheelsets and axleboxes are assembled into the W-irons and straps from brass strip are riveted on using 0.5mm copper wire and a pair of flat smooth-faced pliers as a riveting tool. The paintwork can then be touched up.
Other spring types
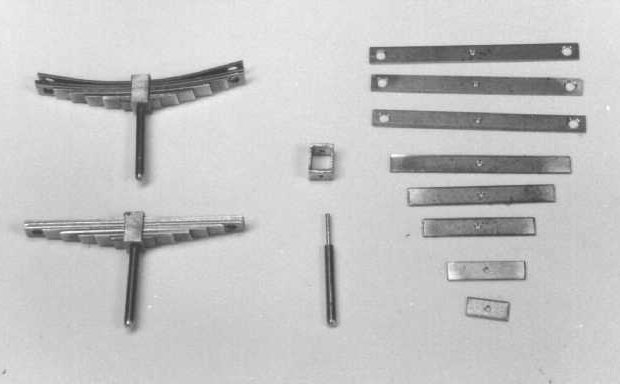
As can be seen from the last photograph other types of working leaf springs can also be made like this. The components shown are for a Danish State Railways type G 0-6-0 goods tender locomotive. As I needed only six springs I made the springs leaves from 2x0.3 mm phosphor bronze strip. The springs are to be installed above the axle boxes with the pegs bearing down on top of the boxes. Spring hangers threaded M1 are inserted into the holes in the spring leaf ends, and special nuts made to look like the prototype assembly are used to secure the springs.
Changes:
2008-03-15: Updated to HTML 4.01 Strict.
2009-01-01: Typeface updated.