Airbrush painting of models
by Erik Olsen (first published in Lokomotivet no. 55, February 1999)
When I as a 13 year old boy began to build a model railway in N scale, I used models of foreign rolling stock. My inspiration was Reitzels Modelbanebøger (Reitzel's Model Railway Books) 1-4 by Svend Pedersen and articles in Hobby Bladet (a magazine) which my father bought. Later I modified ready-to-run stock thus it became more like Danish stock. The models were then to be painted. For my first attempts I used Syntal, which covered badly, and was/where to gloss, later I used Humbrol, which covers better. The gloss is nice to work with and dries slowly so the paint flows together well, but it gathers dust during the drying. It sticks well on metal surfaces. The matte paints looks better, but dries fast so it is difficult to get a smooth surface. It doesn't stick well on metal surfaces thus priming is necessary.
For other reasons after 6-7 years with N scale, I started building models in 0 scale. My first 0-scale model was a KSB-coach built entirely from metal. It was painted with gloss Humbrol that, as time has gone by, has got a little more subdued gloss. The result was reasonable and far better than I had achieved in N. It took a long time, but I was enthusiastic of the large models.
When I bought a spray gun
After still some models, which were rejected before they where, completed, I built a QGB-type van with an underframe from brass. It should be old, matte and dirty. I examined alternatives to matte Humbrol that should stick better on brass. At Nyboder Hobby I found a matte dirty black paint from the American company Floquil for the underframe. According to articles in Model Railroader this should stick well to metal, but it dried fast and must be applied by spraying. At Adamsen I found a Humbrol spray gun with a propellant can. For the van body, which was built from wood, I mixed a suitable brown colour from Humbrol paint; this was also sprayed on. The lettering was Letraset dry transfers with a painted crown. After that the body received one layer of Humbrol matte lacquer, the van was assembled and lightly sprayed with mud and sand colour.
The result was better than I could achieve with them/they earlier techniques. The spray gun was a primitive one with large paint flow and poor atomisation. It didn't matter that mush when bigger surfaces should be covered, but for finer work and weathering it was much too coarse. Furthermore the spray gun used much air, the expensive propellant cans was used up fast.
When I bought an airbrush
If I should achieve better results, I had to have better tools. When more inexpensive airbrush models came on the marked, I bought an Aerograph Sprite at Tutein & Koch circa 18 years ago this time also with a propellant can. Even though it is a relative inexpensive variant of a professional airbrush, I had to grasp deeply in my pockets. Fortunately airbrushes have since then become cheaper.
What is an airbrush? The airbrush was developed in the beginning of this century for professional illustration and retouching, when the graphic trade was a handicraft. It is a miniature spray gun, which has independent control of air and paint flow, you can thus spray on very smooth and thin paint layers and get gradual colour transitions. The control is in one and the same knob: Press down and air comes, pull back and paint comes (the double-action principle). You can push more or less down and pull more or less back. Innermost, the nozzle consists of a paint nozzle with a conical needle. When the needle is drawn back the paint flow is increased. The paint nozzle sits inside the air nozzle so the air flows around the paint nozzle. The colour cup is normally placed on top of the housing.
A double-action airbrush is not that easy to operate, its right use requires some practice. There are today in the hobby marked plainer airbrush models, which are easier to operate. On these only the airflow can be varied with the knob, while the paint flow on some models can be adjusted in advance (single-action principle). The colour cup is placed beneath the housing.
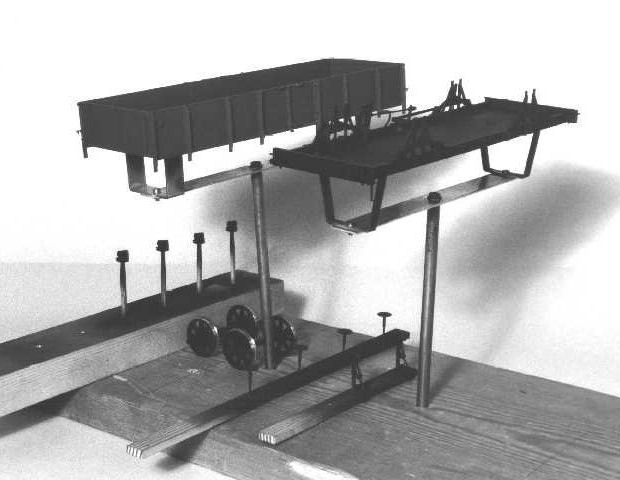
Photo 1: Parts for a Pf-model during drying, all parts with handles attached.
The trick to work with an airbrush is primary to avoid splatter; i. e. unatomised blobs of paint. This happens if there comes paint from the nozzle, while the airflow is small or closed. Thus the principle is 1) air on, 2) paint on, 3) paint off and 4) air off. It is easy to explain, but it takes time before it lies in the fingers. It also takes time to learn to graduate air and paint flow so you can achieve the control and capability that is the double-action airbrush's big strength.
On a single-action airbrush you cannot shut off the paint flow, that's why the paint cup placed beneath the housing so that the paint must be sucked up by the airflow. As a rule it cannot work with very small air and paint flows. A single-action airbrush does not have the same good control as a double-action airbrush.
The cold propellant can
It did, however, not go as I had hoped. One problem was the propellant can, even if the airbrush had smaller air consumption than my first spray gun. The reason is simple: The can contains a propellant in liquid form under pressure. When you use from the propellant, some of the liquid evaporates, so that the used gas is replaced. The evaporation needs heat, and gradually the propellant is cooled and the pressure drops. Soon there isn't sufficient pressure to paint. You can use more cans and change between them, but it is difficult and the cans are expensive. When there is no reduction valve, the pressure will vary and make the operation of the airbrush difficult.
Then followed more years where I rarely used my precious. One day I realised that if I should ever be able to give my models the paint treatment which I had only dreamt of until then, I had to buy an air compressor. I considered building one with a used refrigerator compressor and a used reduction valve. The reduction valve I had showed to be defective, and a self-made air tank can be dangerous. The cheap hobby compressors you can buy were very noisy.
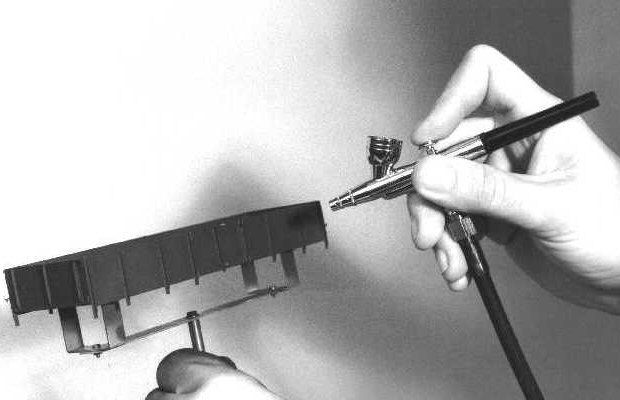
Photo 2: How to hold a double-action airbrush.
Four years ago I bought an air compressor at RAFN-P. It connects to a 220 V socket, has tank, a pressure switch so that it starts and stops, a reduction valve, two pressure gauges (tank pressure and working pressure), and is quite silent when running! I think it is manufactured in Italy, and the price is low compared to what is on the market (June 1998: circa 3000 DKr incl. vat).
The learning process
Now I had got a first-rate air supply, but I still had splatter problems. Why? I read the directions for use, articles and books, and gradually I understood the operation principle, which is described earlier. During some time I have practised further with the Sprite. Splatter can be caused by a defective nozzle or needle, or by dirt. The needlepoint is easily bend; I had to replace mine. If the paint is not thinned sufficiently, paint builds up in the nozzle cap. The built-up paint is carried off with the air as drops. I use to check the nozzle cap frequently. Is there any paint build-up, I clean it off with a brush with thinner and wipe with a paper towel.
Figure 1: Spray painting of inside corners.
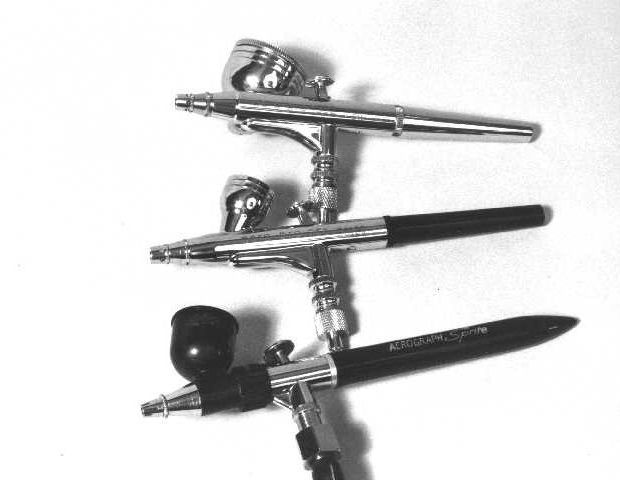
Photo 3: Top Hansa 352, middle Hansa 251 and bottom Aerograph Sprite.
It seemed that the Sprite's paint cup was too small, and I possibly asked too much from it (it has a 0.2mm nozzle). So two years ago I looked around for an airbrush with a bigger paint cup, and possibly a larger nozzle. After many considerations I found a Hansa model 352 with a large side hung paint cup and a 0.3mm nozzle (this model is now discontinued). It appealed to me that it is made entirely from metal, as opposed to some of the Sprite's parts, which are made from plastic (the newer Sprite model seems to be made entirely from metal). Furthermore Hansa's nozzle caps a special design with small air holes which should prevent splatter.
The Hansa is actually easier to work with. It turned out that to many tasks the 0.3mm nozzle is too large. The air velocity is so large that it is difficult to get en even coverage at inside corners on a model, e. g. between side stanchions and side cladding on a van (look at figure 1). Air whirls are created which prevent the paint flow from reaching the surface. This task is solved best with a 0.2mm nozzle, a small air pressure and a small paint flow. It takes some time, the paint have to be built up in thin layers. Floquil dries fast, after a minute or two you can spray on another layer.
Sometimes the Sprite still splatters as paint builds up in the nozzle cap, possibly because I often work with low air pressure (1 bar). Apparently Hansa's nozzle cap is better able to avoid paint build-up. That's why I have now bought a double-action Hansa model 251 with 0.2mm nozzle at RAFN-P (June 1998: 750 DKr. incl. vat). I have not yet much experience with it, but it feels nice to work with.
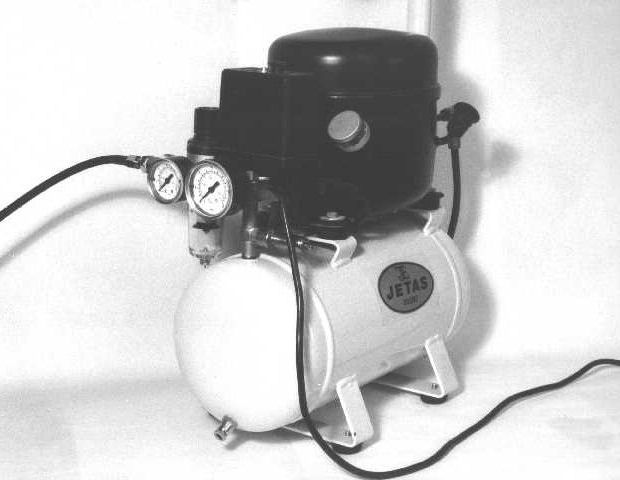
Photo 4: My air compressor.
Making the model ready for painting
When superfluous adhesive or solder on the model is cleaned off; it is taken apart and cleaned thoroughly before painting. I use warm water, scouring paste and an old toothbrush, then warm water, detergent and the toothbrush. Then I wash thoroughly with clean warm water where I also use the toothbrush. To avoid stains I have tried to blow the water off with compressed air, but air from an air compressor contains some oil, and then the surface is not clean anymore. The simplest is to use distilled water, to which you can add a little wetting agent, for the last wash, shake the water off and let the parts dry beneath a cover to avoid dust on the surfaces.
I always take the model apart in as many parts as is practical before painting. The body and the underframe are screwed to handles made from aluminium strip and round brass bar. Axle boxes are pressed onto adapted matches; these and other small parts are pressed into holes drilled in pieces of wood. Wheel sets are masked with ordinary masking tape on the wheel thread and flange, and pieces of plastic tube are put on the axle ends. The plastic tubes protect the axle ends and are used as handles. It is important that the parts can be handled without touching the painted surfaces. Just before painting the surfaces are dusted thoroughly off with a clean soft paintbrush.
Which paint?
I was still fascinated by the Floquil paints, which no more can be bought in this country. The Americans has become so hysterical with safety, that even 30 ml glasses with flammable paint is not allowed in the post or as air cargo. Luckily Floquil paint can be bought at Old Pullman Modellbahnen in Switzerland; that's where I buy it. A special thinner, Dio-Sol, has to be used and other additions as well for a good result, and a colour chart can be bought, too (highly recommended). Floquil has some years ago altered the paint specification so that the paint does not attack polystyrene plastic to the same degree as before. The new paint type is also easier to work with. When spraying, the thinner has almost evaporated when the paint reaches the surface. I have not experienced any problems when painting plastic.
When the paint is sprayed on with an airbrush, it has to be thinned. The most Floquil paints are matte, actually too matte when sprayed; that's why I add some Glaze (half-matte varnish). The paint often dries very fast, then I add some Retarder. If the paint dries too fast, too little thinning may cause it, or the paint may be too old. Then the surface may get a powderish look, as the paint does not merge. The viscosity of the thinned paint should be like full-cream milk (study a glass of milk). It is important that the paint is stirred thoroughly; if the paint is too old it can be difficult to stir well, then you can just as well throw it out. Small lumps in the paint clog with certainty the nozzle.
Floquil specifies for their paints: Matte colours: 75% paint and 25% Dio-Sol or 75% paint, 20% Dio-Sol and 5% Glaze (Glaze gives half-matte surface), gloss colours: 50% paint and 50% Dio-Sol. There can be added until 2% Retarder. I have had luck using the following mixture for matte colours: 70-65% paint, 20-25% Dio-Sol, 8% Glaze and 2% Retarder. For dosage I use 2, 5 and 10-ml disposable syringes that can be bought at the chemist's shop; I mix the paint in an empty clean colour glass and fills the airbrush using a disposable syringe. I set the air supply's reduction valve to 1,4 bar (20 psi) or as low as 1,0 bar (15 psi) if I have to work close. It can be necessary to try a few settings.
For underframes I use Engine Black, Grimy Black, Weathered Black or mixtures. For older brown DSB goods wagons I have tried different mixes after having compared paint samples with wagons on The Railway Museum in Odense. I finally choose Boxcar Red; it covers well so that I don't need priming. I have painted a DSB luggage van using Wisconsin Central Maroon on an Oxide Red priming (any other reddish brown colour can be used), it looks good compared to DSB's old coach maroon. Wisconsin Central Maroon is gloss and does not cover well, the base colour shows through, and then you have to prime. The gloss is nice as my models is from a period in which the coaching stock was kept coaching stock fairly clean. The gloss paint can be weathered as needed and then becomes more matte.
Humbrol paints are also suitable for spraying with an airbrush, but I've had some problems with particles in the paint. I have learned to use only Humbrol thinner as white spirit make the paint precipitate; this will clog the airbrush. The paint/thinner-mixing ratio is not as consistent as for Floquil paints as the viscosity of Humbrol paint seem to vary somewhat. I often use Humbrol for weathering, and then I use more thinner. I don't have experience with other makes of paint.
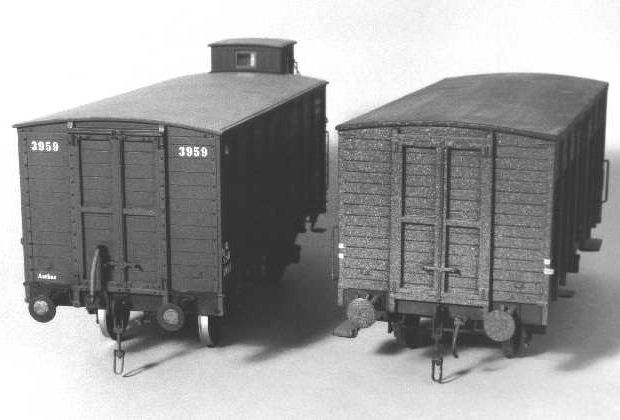
Photo 5: Shows distinct differences in building technique as well as painting and weathering:
Left a model of QE built in 1998, right a model of QGB built in 1977.
Drying, masking and assembly
When the paint is dry to the touch you should check the work. If there are any uncovered spots or other blemishes, they can be rectified now with an airbrush or a paintbrush as appropriate. Masking tape has to be cautiously pulled back and off no later than the day after painting. Be careful not to damage the paint; I normally use a pair of tweezers to get hold of the tape. Subsequently I let the paint dry at least one week. Patience pays off here, irrespective of whether the model is to be painted a second colour or assembled, the paint is far more robust after a week's drying time.
Before the model is spray painted with a second colour, you have to mask off the parts, which must not be painted. I use smooth masking tape of good quality. If the tape is placed on surfaces, which are already painted, I put a strip on a clean cutting mat and cut new clean edges with a scalpel. When the strip is pulled from the cutting mat, it has lost some of its stickiness, and can be placed on the model and pressed firmly down without risk of damaging the paint. More tape strips and paper are added as necessary. Masking tape should not sit on the model in more than 24 hours; otherwise it sticks too well and leaves a residue. I have only bad experiences with liquid mask like Humbrol Maskol; it dries too fast and cannot be cleaned off a paintbrush used for applying it, or pulled off the model.
Because of the difficulties with masking I frequently apply a second colour with a paintbrush instead of spraying, for instance roof surfaces and the inside of open wagons. If you paint a little too far, the superfluous paint can be dried off with a swab stick moistened with thinner - yet another benefit of the base paint's long drying time.
When all parts have dried at least one week after last application of paint, the model is assembled. It can be necessary to scrape a little paint off at certain places where parts fit too tight. The way I assemble my models means that a few small parts are not painted, and even if you are careful, minor damage on the paint can occur; such are repaired after assembly with a paintbrush. At the same time I check for uncovered spots and repair those. I use the same paint mix and gloss as when spraying, just without thinning. The black address fields are painted next.
After yet another week the repairs are dry and I now fix the lettering. I prefer the dry transfer type (like Letraset or Mecanorma), and I get my lettering made especially. The shop "På Sporet" has many dry transfer lettering sets for H0 scale. Subsequently the model is weathered, after drying it is ready to roll out on the model railway. I don't apply clear varnish to my models, partly because a varnish layer has a tendency to cover details, partly because I like the differences between the gloss sides and ends and the matte weathering. Modellers often varnish to protect the model, but I think that people who can't stop poking models ought to keep their hands in their pocketses!

Photo 6: Take care of yourself ....
Safety and health
The paint and thinner makes I've mentioned are actually rather poisonous stuff. You get leukaemia and cancer and a lot fewer brain cells by using it. Particularly when you spray large amounts of thinner evaporates, and the paint mist is dangerous to inhale. Furthermore, thinners and paints are flammable.
If you are cool enough to use these paint types you need lots of fresh air and should use a carbon filter mask (I use a 3M no. 4255 mask which costs 100 DKr). Disposable dust masks lets the thinner vapours pass and won't do. I am considering building or buying a small spray booth with a sucking fan. By using a spray booth you also avoid annoying the rest of the family. The mask should be used during spraying anyway.
Another way is to use other, less poisonous, paint types. Floquil introduced some years ago a new type of acrylic paint, Polly Scale, which is far more safe to work with. The paint is water soluble, but when spraying you still have to use a thinner which evaporates faster than water. The thinner contains alcohol, the vapour of which is also unsafe, and the paint mist is still dangerous to inhale. A proper mask should still be used. I have bought some glasses of Polly Scale paint and matching Airbrush Thinner. Polly Scale is excellent for brush painting; I have not tried airbrush painting yet. I have made some paint samples on brass, after a week's drying time the paint sticks quite well to the brass.
How to get started
I think it pays off to buy a middle class airbrush as the first one, the cheapest will do for coarser work, but not for painting wagons, coaches and locomotives. You get some experience using the first one and learn a lot about spray painting; this knowledge is used when you buy the next airbrush. If you can't afford buying an air compressor, you can start using propellant cans. But I've mentioned the big disadvantages; later on you should buy an air compressor with a tank.
Last a little on maintaining an airbrush: It is a precision instrument that must be kept in good working order. It's the same as using and maintain a paintbrush, if it is not cleaned thoroughly each time you have finished painting, it clogs and may be damaged beyond repair. Read the directions for use thoroughly before you start. It is a good idea to cautiously take apart and reassemble the airbrush beforehand, so that you have tried it when you are cleaning it. For cleaning you should use thinner and equipment which do not damage the airbrush (a paintbrush, toothpicks, paper towels and swab sticks) and which leaves no residue. Beware of broken toothpicks and swab sticks of poor quality. I also use a miniature "bottle cleaner" normally used for tooth cleaning, the airbrush's body can be cleaned inside with this after taking it apart.
Useful addresses
- Tutein & Koch, Farvergade 8, DK-1463 Copenhagen K, Denmark, http://www.tuteinogkoch.dk/ (airbrushes, drawing supplies and much more)
- Rafn-Petersens Eftf., Willemoesgade 2, DK-2100 Copenhagen Ø, Denmark (airbrushes, air compressors, carbon filter masks)
- Old Pullman Modellbahnen, Im Kreuz, Postfach 326, CH-8712 Stäfa, Switzerland, http://www.oldpullman.ch/ (Floquil and Polly Scale paints and thinner)
Changes:
2008-03-15: Updated to HTML 4.01 Strict.
2009-01-01: Typeface updated.
Updated 2009-01-01